Bioactive Enclosure Setup: Step-by-Step Guide
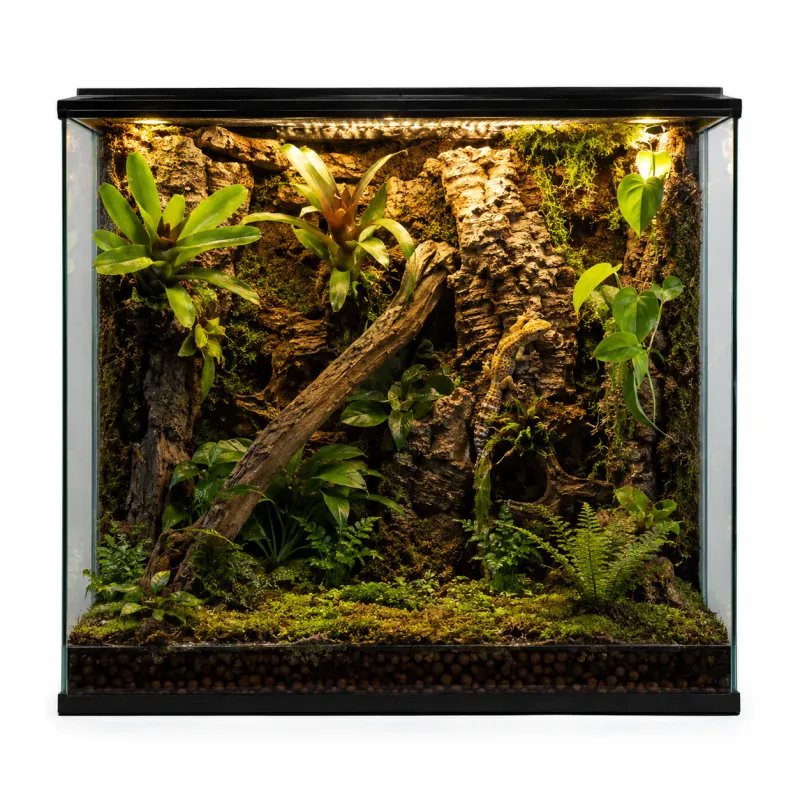
What Is Bioactive?
A bioactive enclosure is a self-sustaining mini-ecosystem where live plants, beneficial microorganisms, and a cleanup crew (detritivores) work together to break down waste, control mold, and maintain soil health. Instead of replacing substrate monthly, a properly cycled bioactive setup can go years with only spot-cleaning and occasional maintenance.
Is it right for you? Bioactive setups require more upfront investment, a 4-6 week cycling period before adding your animal, and ongoing plant care. The payoff: dramatically reduced long-term maintenance, naturalistic beauty, and a more enriched environment for your pet.
Bioactive enclosures mimic natural ecosystems, providing mental stimulation and physical health benefits for reptiles. The living substrate supports beneficial bacteria that break down ammonia from waste, reducing harmful buildup. This approach also encourages natural behaviors like digging and foraging, improving overall animal welfare.
How Bioactive Works
The system relies on a food web: reptile waste and uneaten food become nutrients for plants and detritivores. Springtails and isopods consume organic matter, their waste fertilizes plants, and plant roots aerate the soil. Beneficial bacteria and fungi in the substrate break down complex compounds, keeping the environment fresh. The result is a balanced cycle that requires minimal human intervention.
Bioactive vs. Traditional Setup
| Aspect | Bioactive | Traditional |
|---|---|---|
| Substrate replacement | Every 2–3 years (partial refresh) | Monthly or quarterly |
| Initial cost | Higher (plants, CUC, lighting) | Lower |
| Maintenance time | Reduced long-term | Consistent weekly cleaning |
| Enrichment | Naturalistic, encourages foraging | Limited |
| Odor control | Excellent when established | Requires frequent cleaning |
1. Drainage Layer
The bottom layer prevents the substrate from becoming waterlogged. Use 2–3 inches of hydroballs (expanded clay pellets) or LECA (Lightweight Expanded Clay Aggregate). A drainage layer is essential for tropical/humid setups (crested geckos, dart frogs) but optional for arid setups (leopard geckos, bearded dragons). Cut a piece of PVC pipe vertically and bury it in the corner — this gives you direct access to check water levels and siphon if needed.
Step-by-Step Installation
- Clean the enclosure thoroughly with a reptile-safe disinfectant and rinse well.
- Rinse hydroballs or LECA in water to remove dust, then place them evenly across the bottom to a depth of 2–3 inches.
- Install a PVC pipe (1–2 inches diameter) vertically in a corner, extending from the bottom to above the substrate level. This serves as a water level indicator and siphon access.
- Slope the drainage layer slightly toward the pipe to facilitate water collection.
Drainage Layer Options
| Material | Pros | Cons | Best For |
|---|---|---|---|
| Hydroballs (LECA) | Lightweight, reusable, excellent drainage | Can be pricey | Tropical setups |
| Gravel | Cheap, widely available | Heavy, may trap debris | Smaller enclosures |
| Perlite | Very lightweight | Can float, less stable | Not recommended |
| No drainage layer | Simpler, lower cost | Risk of waterlogging | Arid setups only |
Common Mistake: Skipping the drainage layer in a tropical enclosure leads to soggy substrate, root rot, and harmful bacteria. Always include it for high-humidity environments.
2. Substrate Barrier
Place a fiberglass window screen or landscape fabric between the drainage layer and the substrate. This prevents soil from sifting down into the drainage layer and clogging it. Cut it slightly larger than the enclosure footprint and press it firmly against all edges. Avoid metal screen which will rust.
Installation Tips
- Use a sharp utility knife to cut the barrier to size.
- Overlap edges by at least 1 inch to ensure full coverage.
- Secure the barrier with silicone adhesive (reptile-safe) or by tucking it under the drainage layer edges.
- For enclosures with corners, cut small slits to allow the barrier to fold smoothly.
Why It Matters: Without a barrier, fine substrate particles migrate into the drainage layer, reducing its effectiveness and creating anaerobic conditions that produce foul odors.
3. ABG Mix Recipe
ABG (Atlanta Botanical Garden) mix is the gold standard bioactive substrate. Recipe for ~5 gallons:
- 2 parts tree fern fiber — provides structure and aeration
- 1 part peat moss or coco coir — moisture retention
- 1 part horticultural charcoal — filters impurities, provides surface area for beneficial bacteria
- 1 part sphagnum moss — additional moisture retention and texture
- 1 part orchid bark — aeration pockets for cleanup crew
Mix thoroughly, moisten until it holds shape when squeezed but doesn't drip, and add at least 3–4 inches on top of the barrier layer. For burrowing species, go deeper — 6+ inches.
Mixing Instructions
- Measure each ingredient using a bucket or container.
- Combine all components in a large tub or wheelbarrow.
- Add water gradually while mixing, aiming for a damp but not soggy consistency.
- Test by squeezing a handful: it should hold together but release no excess water.
- Spread the mix evenly over the barrier, ensuring the depth is adequate for your species.
Substrate Depth by Species
| Species Type | Recommended Depth | Notes |
|---|---|---|
| Arboreal (e.g., crested gecko) | 2–3 inches | Shallow, but still supports CUC |
| Terrestrial (e.g., leopard gecko) | 4–6 inches | Allows burrowing |
| Fossorial (e.g., sand boa) | 6+ inches | Deep for tunneling |
Common Mistake: Using garden soil or untreated topsoil can introduce pests, pathogens, or fertilizers harmful to reptiles. Always use organic, chemical-free ingredients.
4. Cleanup Crew (CUC)
The cleanup crew is the engine of a bioactive system. Two primary organisms:
Springtails (Collembola): Tiny white/grey insects that consume mold, fungus, and decaying matter. Essential for mold control. Add a culture to the substrate — they establish within 2–3 weeks. Populations self-regulate based on available food.
Isopods: "Rolly pollies" or "woodlice" that consume decaying plant matter, feces, and leftover food. Best species for bioactive: Trichorhina tomentosa (dwarf white, tropical), Porcellionides pruinosus (powder orange/blue, versatile), Armadillidium vulgare (hardier, arid-tolerant).
Add isopods and springtails simultaneously, provide leaf litter (magnolia, oak, or Indian almond leaves) as food and shelter, and let them establish for 3–4 weeks before introducing your reptile.
Choosing Your Cleanup Crew
| Species | Humidity Range | Temperature Range | Notes |
|---|---|---|---|
| Dwarf White Isopods | High (70-90%) | 70-80°F | Small, prolific, excellent for tropical |
| Powder Orange/Blue Isopods | Moderate-High | 65-85°F | Hardy, visible, good for beginners |
| Armadillidium vulgare | Low-Moderate | 60-80°F | Rolls into ball, arid-tolerant |
| Springtails (all) | Moderate-High | 60-85°F | Essential for mold control |
How to Add CUC
- Introduce springtails first, sprinkling them across the substrate surface.
- Add isopods in small groups, placing them near leaf litter piles.
- Provide a starter food source like a small piece of fish food or vegetable slice.
- Keep the substrate moist but not waterlogged during establishment.
Common Mistake: Adding CUC too early (before plants are established) or in too small numbers. Start with at least 100+ springtails and 20-30 isopods for a standard 20-gallon enclosure.
5. Plant Selection
Choose plants based on the enclosure's humidity and light levels:
| Humidity Level | Recommended Plants | Light Needs |
|---|---|---|
| High (70-90%) | Pothos, bromeliads, ferns, fittonia, peperomia, creeping fig | Low-moderate |
| Moderate (50-70%) | Snake plant (sansevieria), spider plant, dracaena, philodendron | Low-moderate |
| Low/Arid (30-50%) | Aloe vera, haworthia, jade plant, elephant bush, spineless opuntia cactus | High (full spectrum) |
Use organic potting soil around plant roots (remove any perlite which can be ingested). Quarantine new plants for 2 weeks — they may carry pesticides or pests. Thoroughly wash roots and leaves before planting. Place plants before adding cleanup crew, giving roots time to establish.
Planting Techniques
- Dig a small hole in the substrate, place the plant, and firm soil around the base.
- For epiphytes like bromeliads, mount them on hardscape (wood or cork) rather than planting in soil.
- Group plants with similar water and light needs together.
- Add a thin layer of leaf litter over the soil surface to retain moisture and provide CUC habitat.
Quarantine Process
- Keep new plants in a separate container for 14 days.
- Inspect for pests (aphids, mites) and treat with insecticidal soap if needed.
- Rinse roots thoroughly to remove soil and potential pesticides.
- Trim any damaged or yellowing leaves before planting.
Common Mistake: Planting directly in ABG mix without a small pocket of organic soil can shock the plant. Always add a handful of organic potting soil around the root ball.
6. Lighting for Plants
Reptile UVB bulbs alone are usually insufficient for plant growth. Add a 6500K full-spectrum LED grow light with a 12-hour photoperiod. Brands like Arcadia Jungle Dawn or Nicrew aquarium LED bars work well. Position plants so taller species don't shade shorter ones. For arid setups, a single strong LED bar at the top is sufficient; for planted tropical setups, multiple lower-wattage strips distributed across the enclosure provide even coverage.
Lighting Requirements by Setup
| Setup Type | Light Intensity | Photoperiod | Recommended |
|---|---|---|---|
| Tropical planted | Moderate (20-40 µmol/m²/s) | 12 hours | 2-3 LED strips |
| Arid succulent | High (40-60 µmol/m²/s) | 12-14 hours | 1 strong LED bar |
| Low-light (snake plant) | Low (10-20 µmol/m²/s) | 8-10 hours | Single low-wattage strip |
Placement Tips
- Mount lights 6-12 inches above the canopy to avoid burning leaves.
- Use a timer to maintain consistent photoperiod.
- Monitor plant growth — leggy growth indicates insufficient light; yellowing leaves may indicate too much.
- Clean light fixtures monthly to maintain output.
Common Mistake: Relying on room lighting or a single UVB bulb. Plants need dedicated grow lights to thrive, especially in low-light locations.
7. Cycling Period
Do not add your reptile immediately. A bioactive enclosure needs 4–6 weeks to establish:
- Week 1–2: Plants establish roots. Monitor humidity and adjust ventilation. Add springtails.
- Week 3–4: Add isopods and leaf litter. Begin seeing mold blooms — this is good (food for springtails). If mold persists over a large area, increase ventilation.
- Week 5–6: Cleanup crew populations stabilize. Leaf litter should show signs of decomposition. Substrate should smell earthy, not sour. Introduce your reptile.
Signs of a Cycled Enclosure
- No foul odors — only earthy scent.
- Mold blooms have subsided (except small, localized patches).
- Isopods are visible and active, especially at night.
- Springtails are abundant on the substrate surface.
- Plants show new growth.
Troubleshooting Cycling Issues
| Problem | Likely Cause | Solution |
|---|---|---|
| Persistent mold over large areas | Poor ventilation | Increase airflow with a fan or more vent openings |
| Isopods dying | Too dry or too wet | Adjust moisture; add moisture gradient |
| Springtails not visible | Population too small | Add another culture |
| Plants wilting | Root rot or light issues | Check drainage, adjust light |
8. Maintenance Schedule
| Frequency | Task |
|---|---|
| Daily | Remove uneaten food, spot-clean visible waste, mist if needed |
| Weekly | Wipe glass, check drainage level, trim dead leaves, replenish leaf litter |
| Monthly | Check plant health, prune overgrowth, add isopod/springtail booster culture if population seems low |
| Every 6–12 months | Partial substrate refresh (top 1–2 inches), major plant trim, deep siphon drainage layer if water table is high |
| Every 2–3 years | Full teardown and rebuild (recommended for high-waste species) |
Detailed Maintenance Tasks
Daily
- Remove any leftover food within 24 hours to prevent mold.
- Spot-clean feces using tweezers or a small scoop.
- Mist to maintain humidity, but avoid waterlogging.
Weekly
- Wipe glass with a reptile-safe cleaner to remove hard water spots.
- Check the drainage layer water level; siphon if it exceeds 1-2 inches.
- Trim yellow or dead leaves to encourage growth.
- Add a handful of leaf litter to replenish CUC food.
Monthly
- Inspect plants for pests or nutrient deficiencies.
- Prune overgrowth to prevent shading.
- Monitor CUC population; add booster culture if needed.
Seasonal Adjustments
During winter, humidity may drop due to heating; increase misting frequency. In summer, higher temperatures may require more ventilation. Always adjust based on your local climate and enclosure conditions.
What Not to Do
- Skipping the cycle: Adding your reptile on day one defeats the purpose. The cleanup crew needs time to establish before they can handle waste.
- Too few isopods/springtails: Start with generous cultures. A small population can't keep up with a reptile's waste output.
- Wrong plants for humidity: A succulent in a tropical enclosure will rot within weeks. Match plants to the enclosure's humidity, not just what looks nice.
- No leaf litter: Without leaf litter, isopods have no shelter or supplementary food source. Provide a thick layer that's replenished regularly.
- Over-cleaning: A bioactive system is not sterile — it relies on microorganisms. Don't remove all leaf litter or disturb the substrate deeply. Let the ecosystem do the work.
Additional Common Mistakes
- Using tap water with chlorine — always dechlorinate or use reverse osmosis water.
- Overfeeding the reptile, leading to excess waste that overwhelms CUC.
- Ignoring temperature gradients — plants and CUC need appropriate temperatures too.
- Using non-organic fertilizers or pesticides — toxic to reptiles.
Frequently Asked Questions
How long does a bioactive enclosure last?
A properly maintained bioactive setup can last 2–3 years before a full teardown is needed. With partial substrate refreshes every 6–12 months, you can extend its life. High-waste species like large snakes may require more frequent rebuilds.
Can I convert an existing traditional enclosure to bioactive?
Yes. Remove all old substrate, clean the enclosure thoroughly, then follow the steps: add drainage layer, barrier, ABG mix, plants, and cleanup crew. Cycle for 4–6 weeks before reintroducing your reptile.
What if my cleanup crew population crashes?
If isopods or springtails die off, add a booster culture and address the underlying cause, which is usually incorrect moisture, temperature, or lack of food. Ensure leaf litter is plentiful and the substrate is moist but not waterlogged.
Do I still need to spot-clean if I have a cleanup crew?
Yes, daily spot-cleaning of visible waste is still recommended, especially for large feces. The cleanup crew handles smaller waste and organic matter, but removing large piles prevents odor and reduces the load on the system.
Related Reading
Check optimal temps, calculate feeding, and find your perfect species match.
References
- Atlanta Botanical Garden (2020). ABG Mix Recipe.
- Neher, D. (2019). Soil Biology in Vivariums. Journal of Herpetoculture, 12(3), 45-52.
- Arcadia Reptile (2021). Lighting Guide for Planted Enclosures.
🐾 Join the Community
See how other keepers set up their enclosures, ask questions, and share your experience.
🛠️ Apply What You Learned
Check optimal temps, calculate feeding schedules, and get calcium dosage — all personalized for your species.
Comments